Setting Up E-Commerce Tracking For GA4 On WordPress
Google Analytics (Universal Analytics) as we know it will cease sending data on 1st July 2023. That means everyone who uses Google Analytics, will need to move to Google Analytics 4.
I won’t lie…I’m not a huge fan of Google Analytics 4. It’s clunky even for digital marketing experts like us, let alone for those who don’t work with analytics day in, day out. But, needs must.
So how do you start sending e-commerce information, such as revenue, through to Google Analytics 4 if you’re using a WordPress site? There is some technical implementation required, but hopefully we’ll keep it simple for you to follow.
Firstly, this guide is geared up for anyone using WordPress for their e-commerce site. We are also going to assume you use Google Tag Manager, as the implementation of e-commerce tracking requires this set up, as well as the GTM4WP plugin.
If you use Shopify, head over to our GA4 Shopify guide.
Here’s an outline of what we’ll cover:
- E-Commerce reports in GA4 – what you should see
- Types of e-commerce interactions you want to include in your GA4 reports
- The all important data layers & how to deploy them on WordPress / WooCommerce
- Sending e-commerce information to Google Analytics (GA4)
E-Commerce Reports In GA4
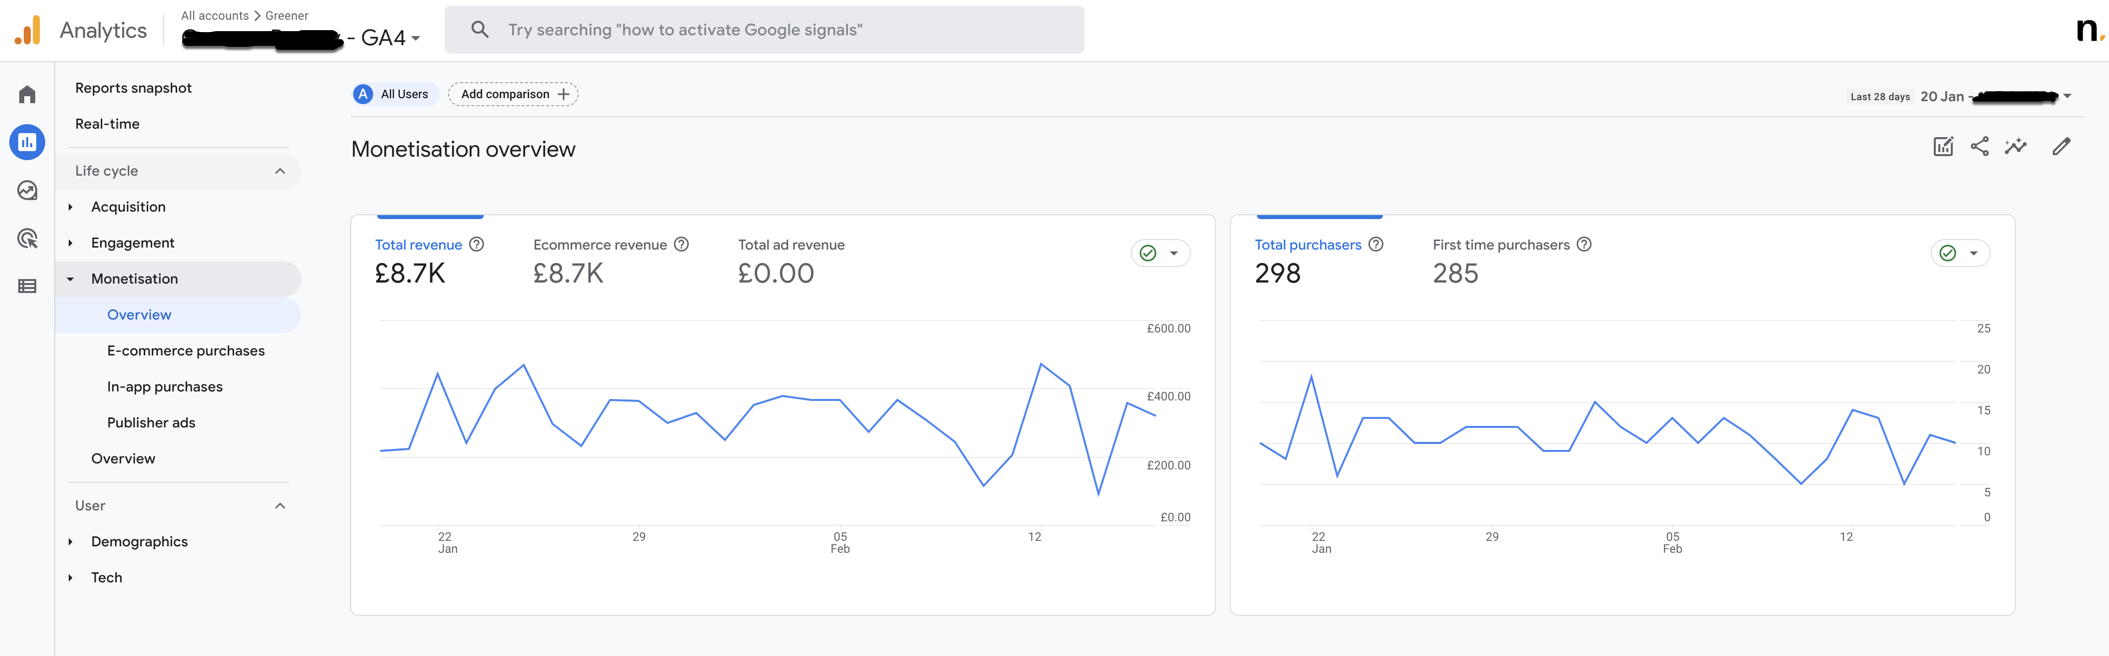
Once you login to Google Analytics, go to Reports > Monetisation > Overview. This gives you an idea of how much revenue has been generated over the specified time period, and how much purchasers there were (some info has been blanked out on various screen shots for confidentiality):
To get more useful information, go to Reports > Monetisation > E-commerce purchases . The screen shot below gives you an idea of what data you should expect to see when Google Analytics 4 e-commerce tracking has been implemented:
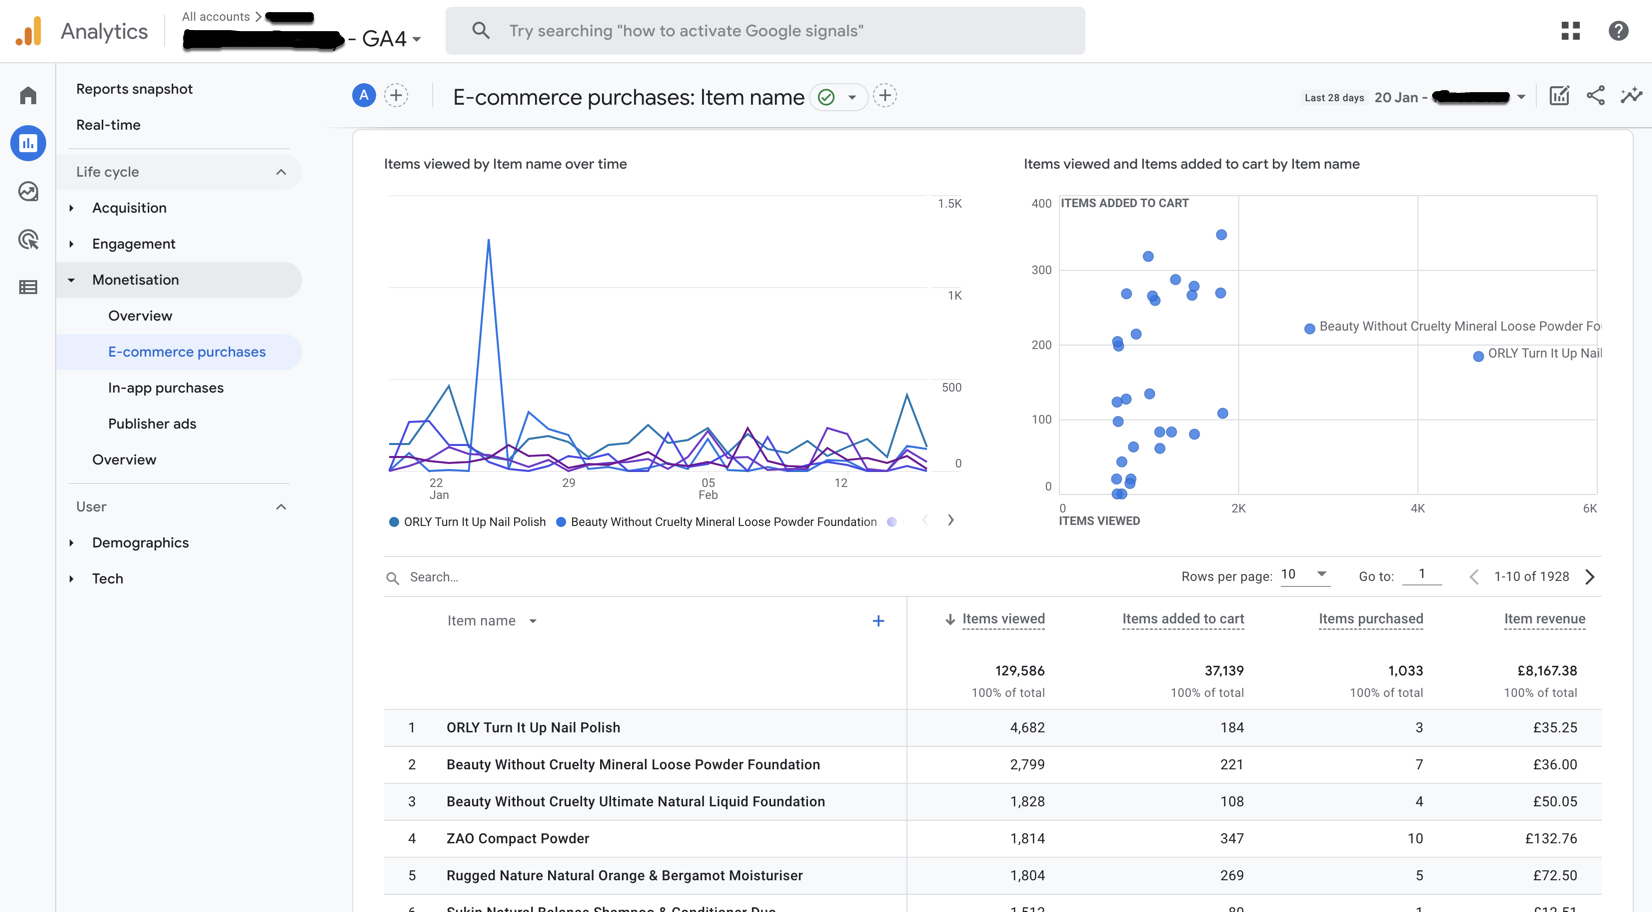
You’ll see various bit of useful information here, such as which products were added to the cart, which items got the most views, and more importantly, revenue by product.
This e-commerce information and within the e-commerce purchases report is not available by default, however. We need to do a bit of tag implementation with the help of Google Tag Manager to get information like this into your GA4 account.
E-Commerce Interactions In GA4
There are various types of interactions that users will take on your e-commerce site. All of the following interactions will be useful to track, and show in GA4 reports:
- Product category impressions
- Select & view item / product
- Add to cart
- Begin checkout
- Complete purchase
Now the important bit – this information is not available by default in GA4, and there is no quick setting that will allow Google Analytics to pull eCommerce data. You need to tell Google Analytics this information so that it has the relevant data available to build the reports.
You may have seen the notifications in the top bar of Google Analytics saying they will migrate you over to GA4 automatically if you haven’t set up a new GA4 profile, BUT – it will only have the equivalent ‘basic features such as goals and Google Ads links’. So if you don’t have Goals set up on Universal Analytics, there won’t be anything to migrate to GA4.
So how do you create this data to send to GA4? You build a data layer…
Product Level & Purchase Level Data Layers
A data layer is a piece of JavaScript that is used to pass information from your website to other systems, such as Google Tag Manager, Google Analytics, Google Ads and Meta.
The official Google documentation on data layers – whilst useful to see what the data looks like – is absolutely awful. There are no templates for different systems, and for the average person on the street, it is nigh on impossible to decipher.
The screen shot below shows what a purchase data layer should look like once populated, and an example template, for use with WooCommerce, taken from ewerkstatt on Github:
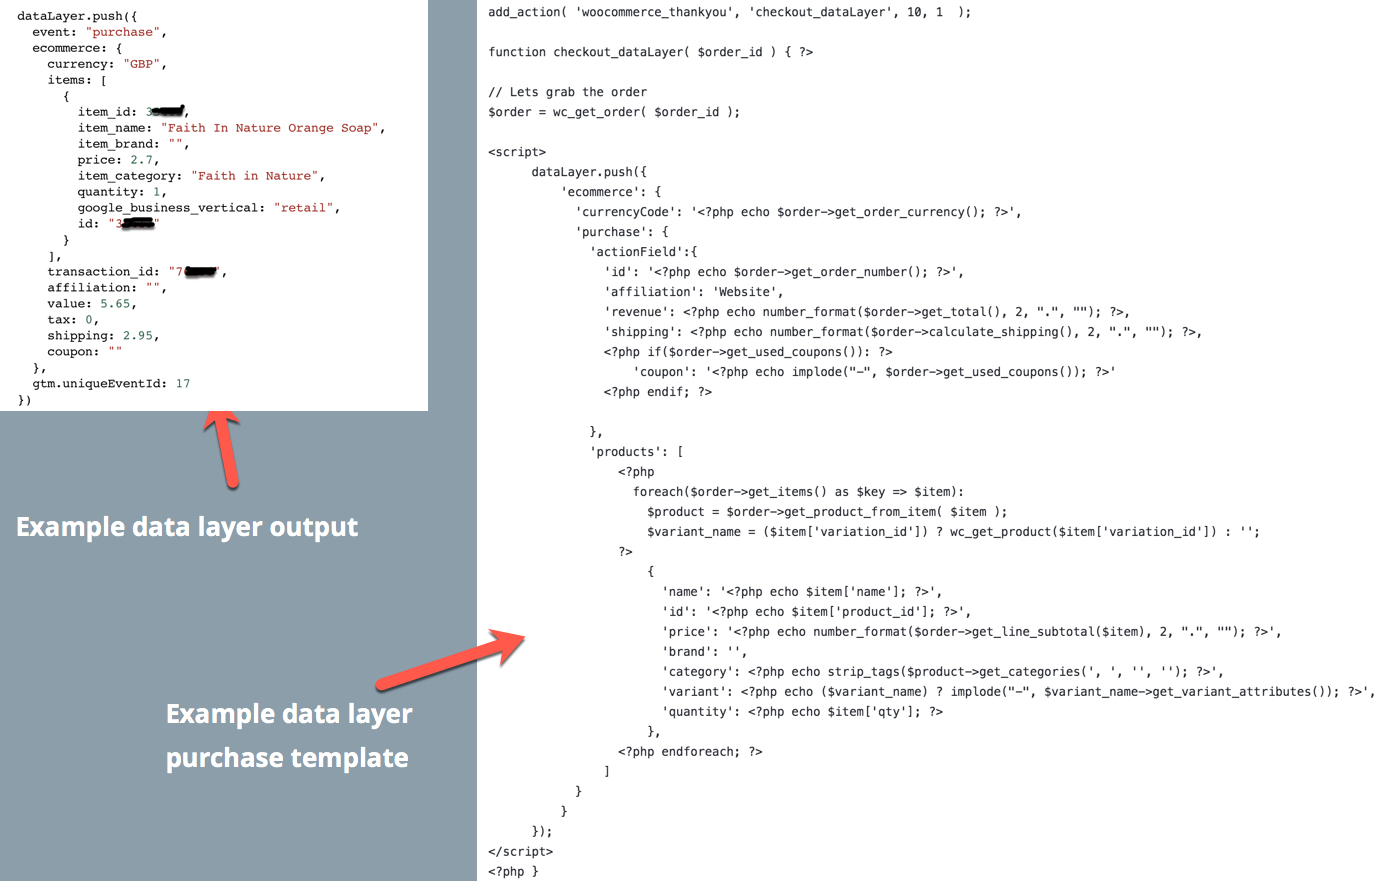
The image above is an example of a purchase data layer, as in the datalayer used when a purchase or order is completed. But there are other datalayer codes required to capture other information, such as product category impressions, when a user selects and item, or adds it to their cart. These are product level data layers, and should generate everywhere other than the order confirmation page.
So how do you generate these data layers?
Well, you could do it manually…going and finding the bits of code above, getting access to your hosting files and adding them in the relevant places, but this guide is about keeping things simple. So the best way of deploying the datalayers is to use the GTM4WP plugin.
Using GTM4WP & Testing The Data Layer
Once you’ve added GTM4WP, go to the plugin settings and add your Tag Manager ID. Ensure the container code is switched to ON, and click Save Changes (double check the container code is saved to ON once you click save).
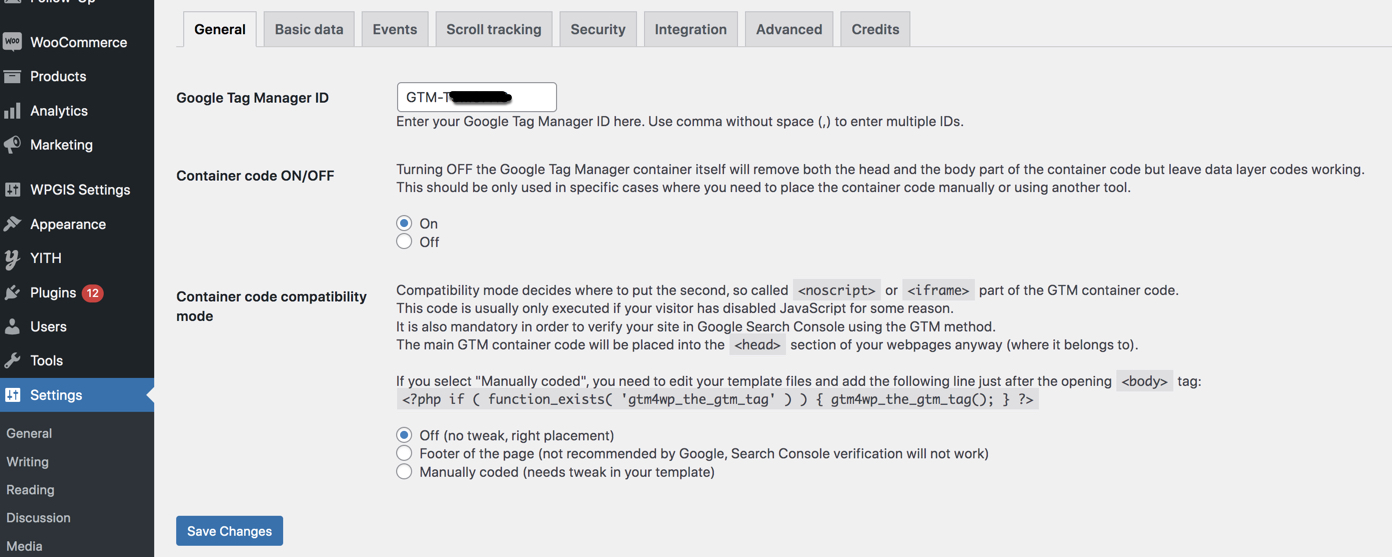
This, magically, now means you have a) added Google Tag Manager code to your site, and b) added the relevant data layer codes. That was easy wasn’t it?!
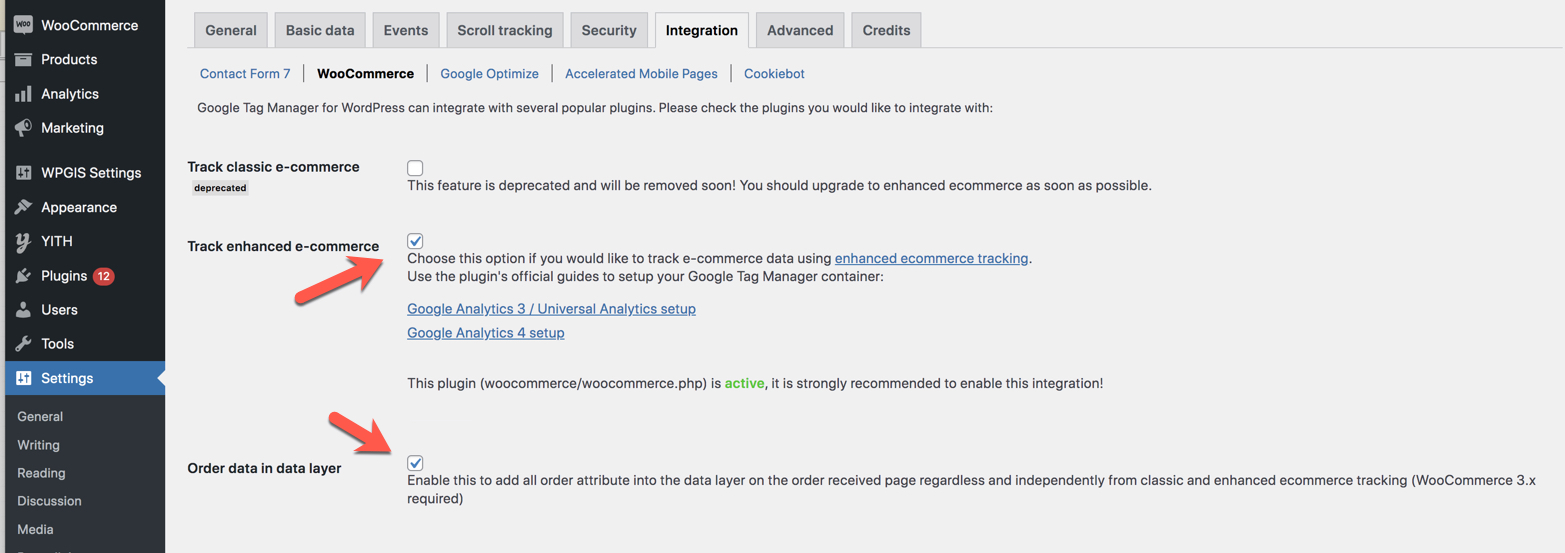
The other setting you’ll need to amend is in Integration > WooCommerce. Ensure track enhanced e-commerce is checked, AND, further down the page, tick ‘order data in data layer‘. There are various other options on this page, but those are two you’ll require for now. Remember to hit Save Changes at the bottom of the page.
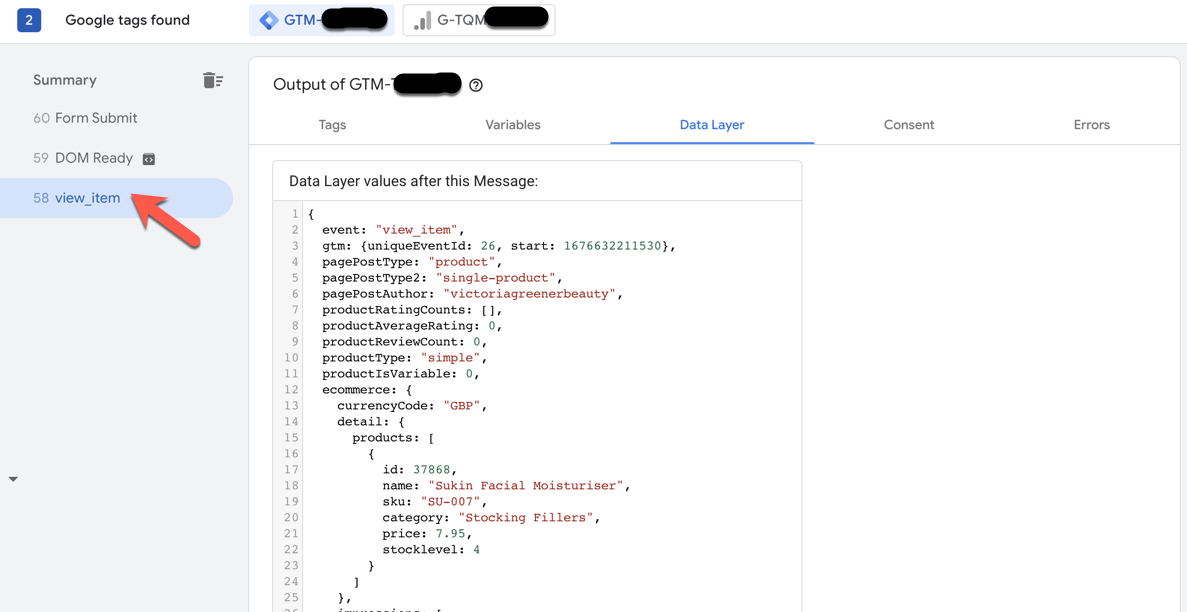
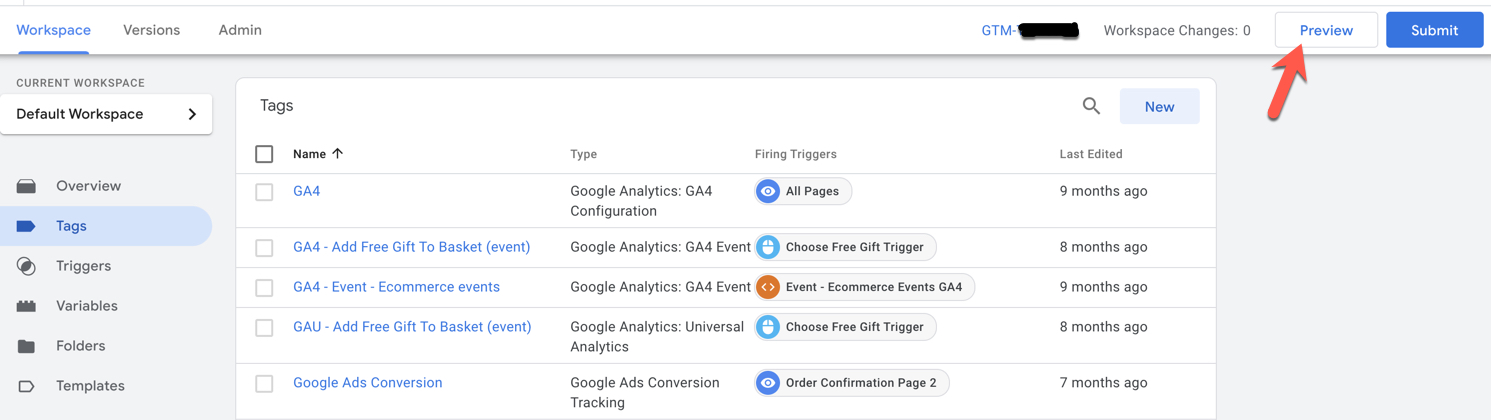
The next step is to head over to Google Tag Manager. With the data layer now active, you should be able to use the Preview debug mode to check it’s loading. Hit Preview in the top right bar, enter your website address and then wait for Tag Manager to connect.
Now you should be able to view categories and view individual products and spot the data layer being created on those pages. This is an example data layer showing on a product page:
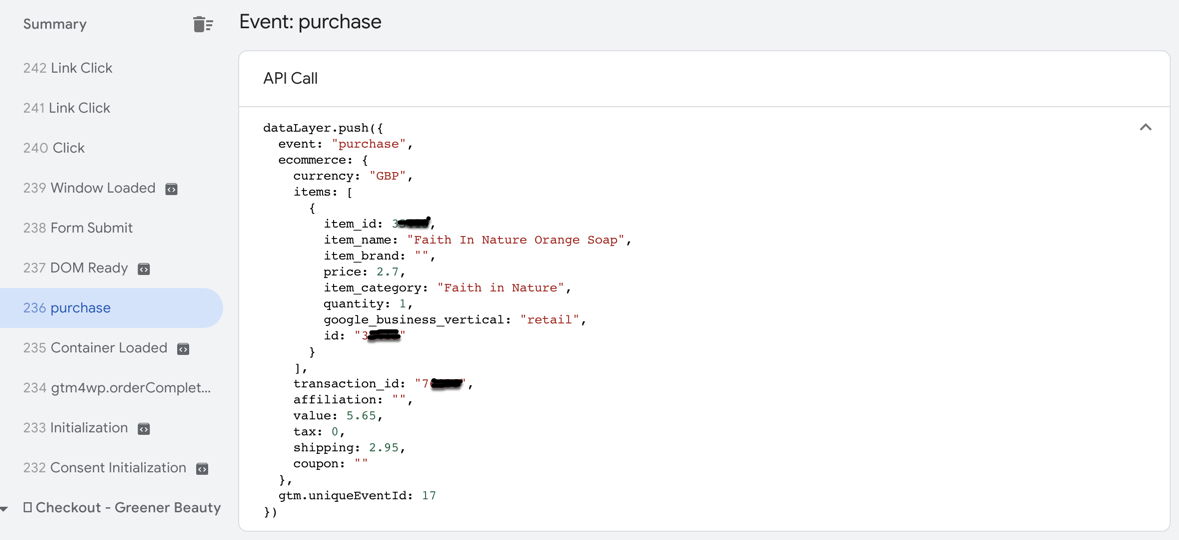
You should also use the same debug view to check category pages for view_item_list, add to cart, begin_checkout and purchase data layers. This is the example data layer now being created on the order confirmation page, showing a purchase event:
Great! Now that the data layers are being created and being sent to Google Tag Manager, we now need to send the various bits of information to Google Analytics (GA4).
Sending E-commerce Data To Google Analytics (GA4)
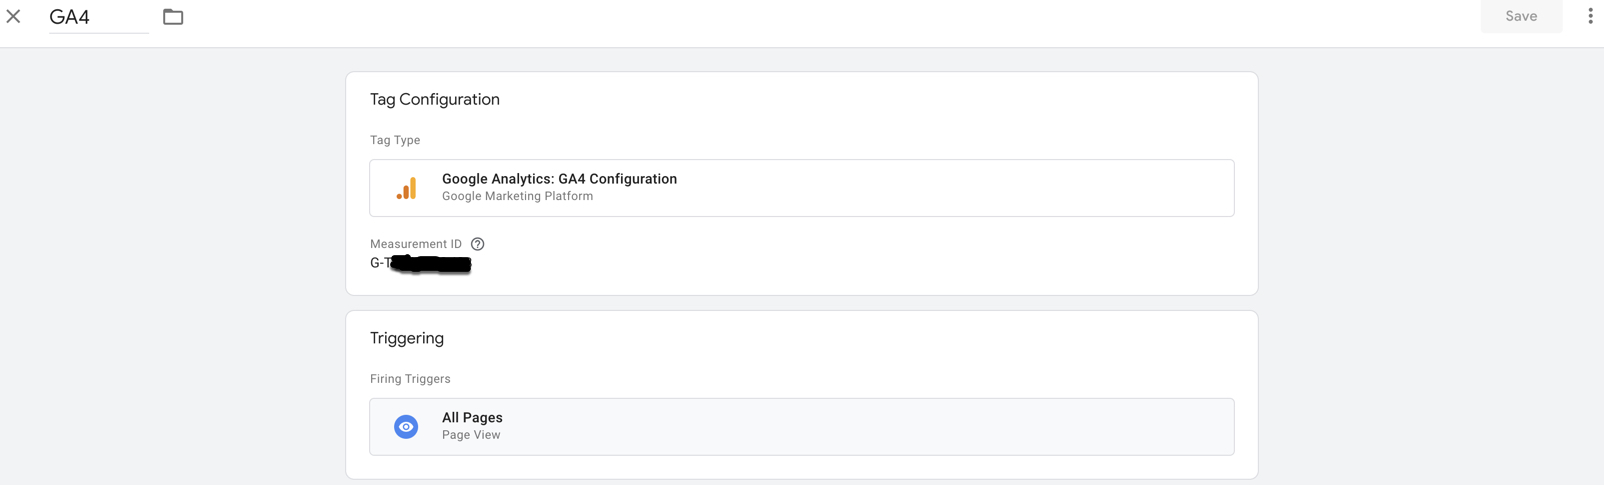
Firstly we’re going to assume you already have the main Google Analytics 4 configuration tag set up. To recap, all you need for this is your Data Stream Measurement ID (get this in Google Analytics, go to Admin > Property > Data streams, then click on the data stream and copy the Measurement ID (it looks like G-xxxxxxxxx). Add this into the main GA4 configuration tag in Google Tag Manager and ensure it triggers on All Page Views:
Once that’s complete, we need to create Event level tags that fire based on your data layer information.
Again, the simplest way of doing this is to follow the instructions on the GTM4WP blog, which instructs you to download a GA4 container template which you can merge with your others tags. This will create the tag, the triggers and the variables you need to send all the event tracking information to Google Analytics.
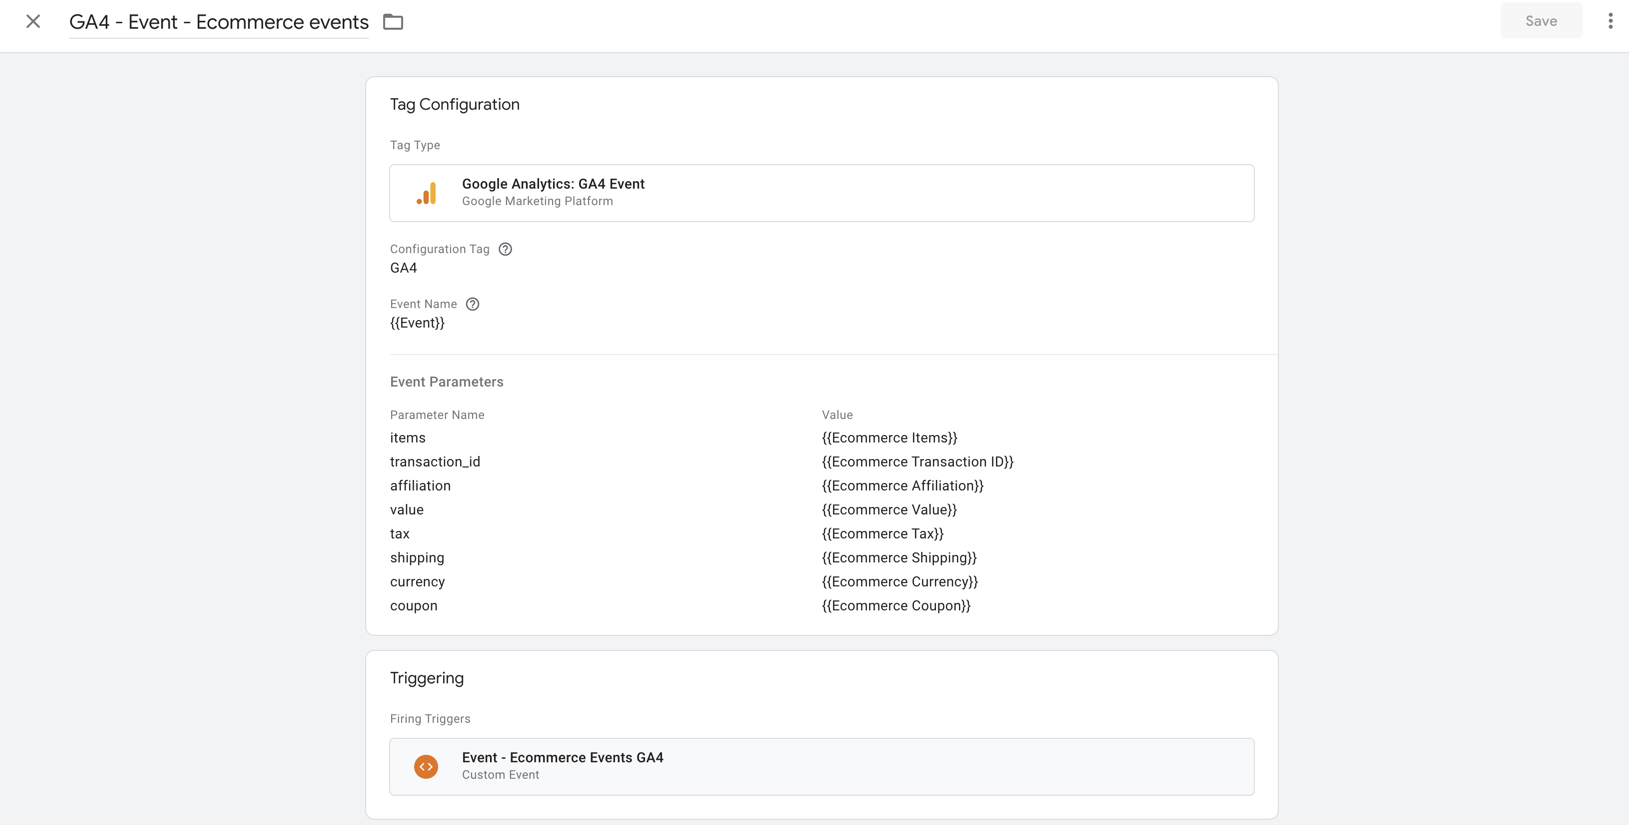
All you need to do is open the Google Analytics: GA4 Event tag that is created, and ensure it fires using the correct GA4 configuration tag. All the instructions are on the blog post link above.
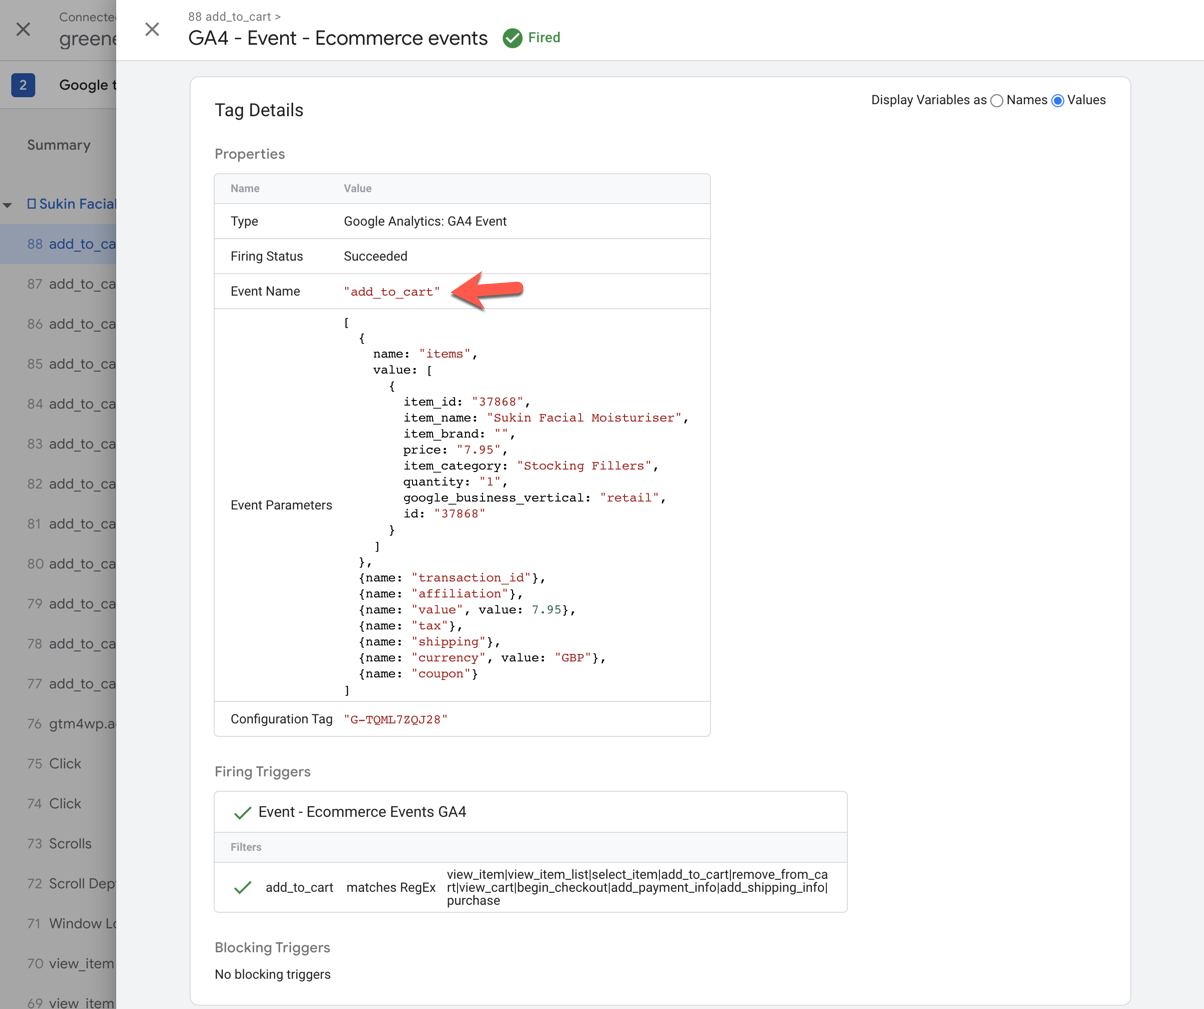
The open tag looks like this (notice the custom event trigger uses RegEx matching to fire on all the relevant e-commerce events):
There is a more manual way of doing this, as explained in our Shopify version of this post, or you can follow the instructions in this post.
So, with your configuration tag set up, and now all the e-commerce event tags set up, you should now head back to Google Tag Manager and the Preview debug tool to see if the e-commerce event data is being sent to GA4.
Enter your website once you’ve hit Preview, and let the debug tool load.
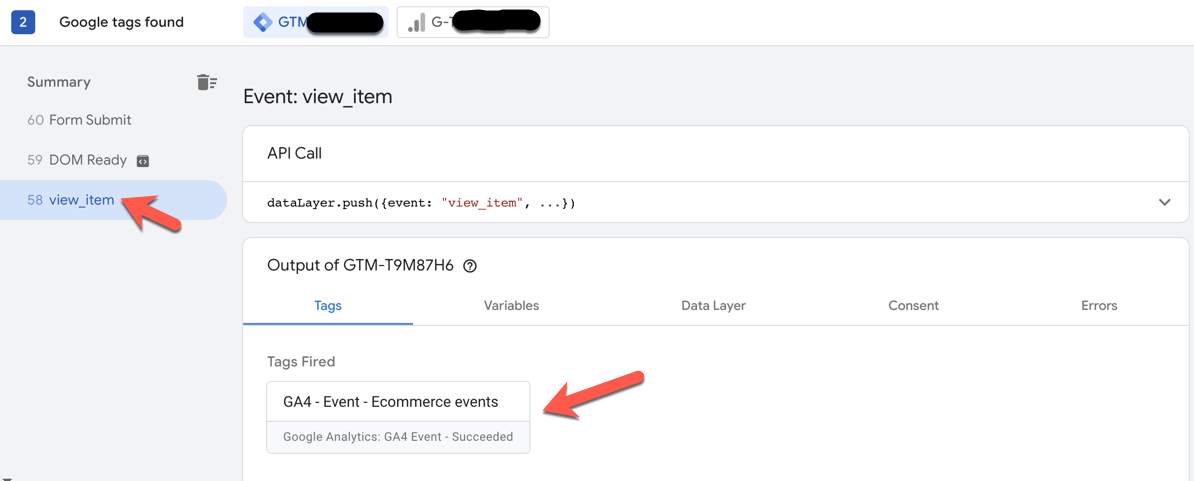
Now you can navigate to product category pages, or product pages and see both the data layer AND the GA4 tags being fired, which means the information is being sent to Google Analytics:
Example of a product page:
You should see the same event tag being fired on category pages, add to cart, begin checkout and purchase pages. To see the event parameter level detail simply click on Variables and you’ll be able to see the event parameters captured and sent to GA4, and how the tag fired (example from Add to Cart event below):
Great! E-commerce data is now being sent to GA4!
You can also open the debug view in GA4 if you want to double check all the information is landing there. If you to a test purchase with Google Tag Manager Preview debug tool, this will automatically open the debug view on GA4 (found at Settings > Admin > Debug view). You’ll hopefully be able to see the purchase event, and going to the items tab will display information about all the items that were bought. Other details like the value and transaction ID can be seen in the parameters tab.
Voila! You’ve now configured Google Analytics 4 to collect e-commerce data from WooCommerce / WordPress.